Introduction
This is a continuation from my previous article Where To Host .NET Applications . Go check that one too. In this blog post we will create a simple .NET application. Then we will dockerize it the easy way and host it in a Linux VPS so that the whole world can see it.
Create simple application
Let’s start with creating the application. As I said the application will be a simple one. We will make a web application that will give us the environment variables of the Docker container.
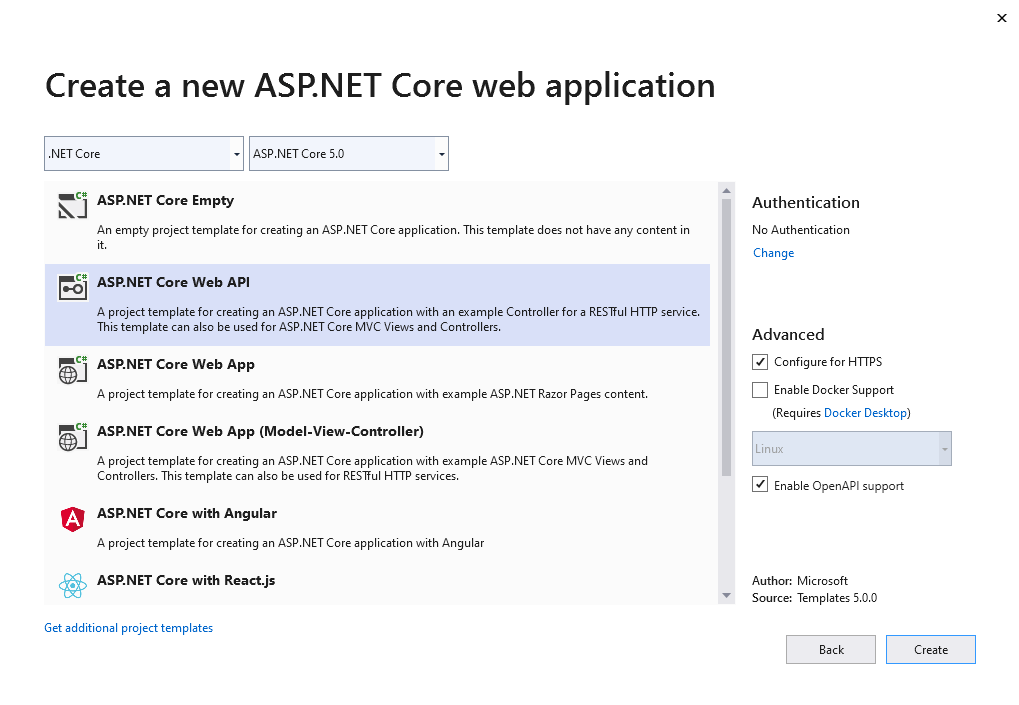
Let’s create a .NET 5 application and call it EnvPrinter. For this example, we will choose the ASP.NET Core Web API template:
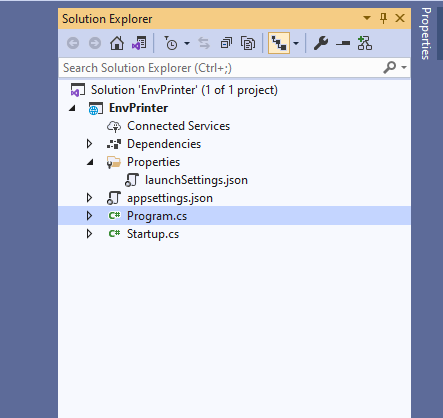
After the creation of the project let’s remove the boilerplate code. Basically, you only need the Program.cs and Startup.cs:
Now we can add the logic to print the environment variables:
using Microsoft.AspNetCore.Builder;
using Microsoft.AspNetCore.Hosting;
using Microsoft.AspNetCore.Http;
using Microsoft.Extensions.DependencyInjection;
using System;
using System.Text.Json;

namespace EnvPrinter
{
    public class Startup
    {
        public void ConfigureServices(IServiceCollection services)
        {
        }

        public void Configure(IApplicationBuilder app)
        {
            app.Run(async context =>
            {
                string json = JsonSerializer.Serialize(Environment.GetEnvironmentVariables());
                await context.Response.WriteAsync(json);
            });
        }
    }
}
Dockerize application
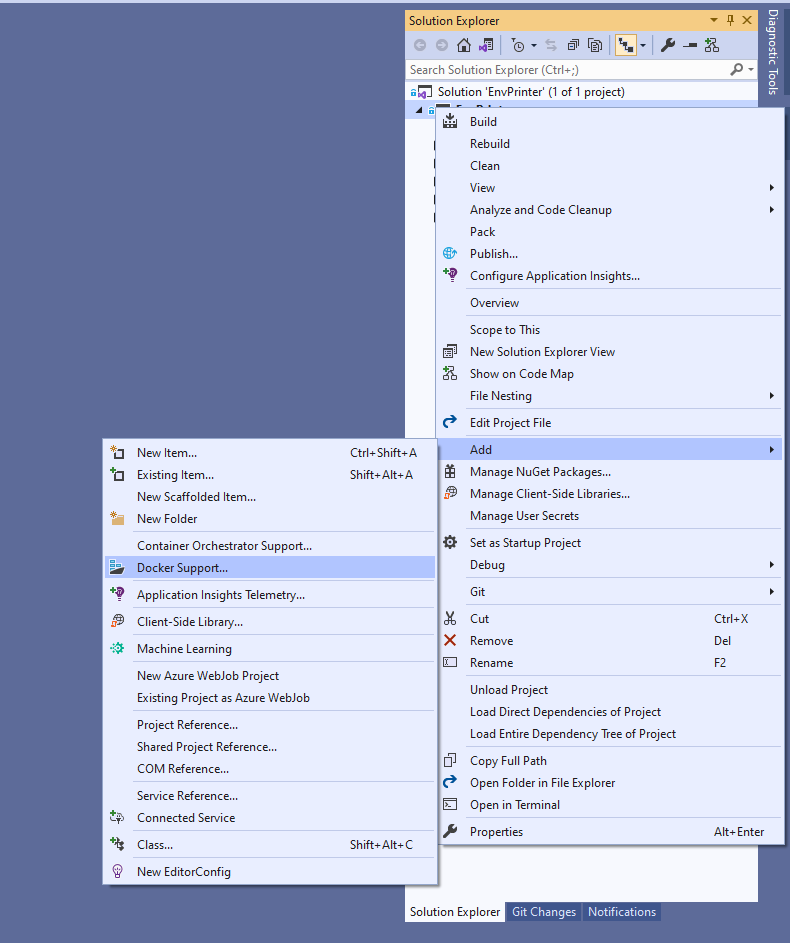
We are keeping things as simple as possible. Now all we need is a Docker file. You can take the slow road and make one yourself or rely on Visual Studio to build one. I will take the second approach. Right click on ASP.NET Core project and head to Add -> Docker Support.
Select the Linux OS and we have the Dockerfile auto generated for us. Isn’t that cool? Here is how our Dockerfile should look like:
#See https://aka.ms/containerfastmode to understand how Visual Studio uses this Dockerfile to build your images for faster debugging.

FROM mcr.microsoft.com/dotnet/aspnet:5.0-buster-slim AS base
WORKDIR /app
EXPOSE 80
EXPOSE 443

FROM mcr.microsoft.com/dotnet/sdk:5.0-buster-slim AS build
WORKDIR /src
COPY ["EnvPrinter/EnvPrinter.csproj", "EnvPrinter/"]
RUN dotnet restore "EnvPrinter/EnvPrinter.csproj"
COPY . .
WORKDIR "/src/EnvPrinter"
RUN dotnet build "EnvPrinter.csproj" -c Release -o /app/build

FROM build AS publish
RUN dotnet publish "EnvPrinter.csproj" -c Release -o /app/publish

FROM base AS final
WORKDIR /app
COPY --from=publish /app/publish .
ENTRYPOINT ["dotnet", "EnvPrinter.dll"]
All we must do now is to create the image and push it to docker hub. This is the place where you should make a docker hub account if you do not already have one. Here comes a little tricky part, when you generate the Dockerfile with Visual Studio. Building it requires a little patience. If we go directly to EnvPrinter project where Dockerfile is generated and try:
docker build .
We get an error stating the following
Step 7/17 : COPY failed: file not found in build context or excluded by .dockerignore: stat EnvPrinter/EnvPrinter.csproj: file does not exist
That is because Visual Studio uses the top-level directory as root, and we need to call docker build from the solution directory. If we ran the same command from there, we will get another exception:
unable to prepare context: unable to evaluate symlinks in Dockerfile path: CreateFile C:\Users\USERNAME\PROJECTS\EnvPrinter\Dockerfile: The system cannot find the file specified.
Now, Docker cannot file the Dockerfile. We need to specify it explicitly:
docker build -f ".\EnvPrinter\Dockerfile" -t your_docker_hub_username/env-printer .
Replace your_docker_hub_username with your docker hub username and please note that there is a dot(.) at the end. At this point everything should be built successfully. And you can verify that by executing:
docker images
You should see a Repository named env-printer:

The last thing that we need is to push our image to docker hub. Which is quite easy:
docker push your_docker_hub_username/env-printer
At this point you should be able to see your image in docker hub
Host EnvPrinter on VPS
Connect to your VPS. I am using Contabo VPS and Ubuntu 20.04.1 LTS for my applications. You can check this blog post on where to host your .NET applications. We are connecting using ssh. Since the new PowerShell has built in support for SSH it is enough just to open a PowerShell window and type this:
ssh username@ipaddress
Where username is your username and ipaddress is the ip address of your VPS. After the connection is established first thing, we should do is to install docker:
sudo apt-get install docker
Verify the installation by running:
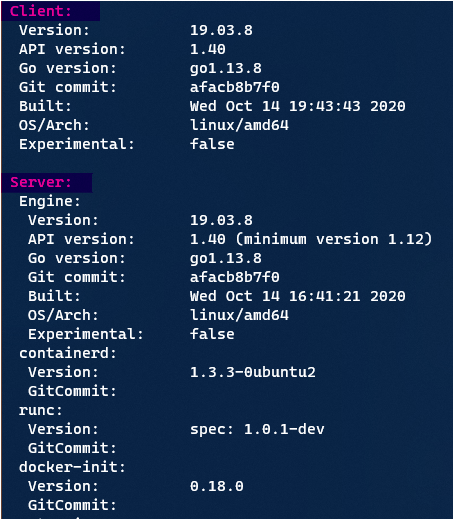
docker version
You should see both Client and Server versions like this one:
Docker Security Vulnerability
If you did not see or heard the horror stories about Docker’s vulnerability on the internet this post should be a big trigger! What do I mean? Docker does not respect the firewall rules in your VPS when you are exposing ports. Every port you expose to a container becomes a public port.
You can easily verify this by downloading this test http application which displays your container id:
docker run --rm -it -p 8080:80 strm/helloworld-http
Notice that we are mapping local port 8080 to container port 80. Now you can browse your VPS’s ip address on port 8080 and you will see the response from the sample http applications. Pretty creepy isn’t it? We did not allow 8080 from our firewall yet there is a connection to it. So, what can we do to modify this behavior? State your localhost explicitly:
if you stop the container and run:
docker run --rm -it -p 127.0.0.1:8080:80 strm/helloworld-http
Now you can curl the address from inside the VPS but not from the internet. What does this teach us? Do not expose your database and private servers to the internet by assuming that Docker respects the firewall rules - it does not.
This raises a question. What should you do if you want to expose a container over the internet for only a specific IP address? You can go check the open source project ufw-docker by Chai Feng. He has a detailed article on why this problem occurs and how you can fix it.
Continue with EnvPrinter hosting
Now we have an understanding about Docker’s unexpected behavior we can use this to our advantage and host our application. The process is simple. All you must do is to pull the image that we have created earlier:
docker pull your_docker_hub_username/env-printer
Verify that the download is successful by executing:
docker images
And checking that your_docker_hub_username/env-printer image exists.
Last thing that we should do is to run our container:
docker run -p 80:80 your_docker_hub_username/env-printer
Since we have already talk about the Docker’s unexpected behavior, we know that nothing more is necessary to browse our application from the internet. Just type your VPS’s ip address in a browser and you should see the environment variables of our container.
Conclusion
We created a little application which consists of only 2 files. We dockerized it using th built in Visual Studio tool and learned how to create an image based on that. We deployed the application to VPS and talked about Docker’s vulnerability which can certainly bring you headaches.
How do you host your applications? Share with me in the comments.
Thank you
Your post has been submitted and will be published after moderation.
OK
OOPS!
Your post has not been submitted. Please return to the page and try again. Thank You!
If this error persists, please open an issue by clicking here.
OK